Managing risk effectively requires more than simply identifying potential hazards. Organisations must also understand how the hazards arise, the types and magnitudes of consequences, and whether there are an appropriate number and type of controls in place to prevent or minimise their impact to a tolerable level.
A Bowtie Risk Assessment, also known as Bowtie Analysis, is a visual risk assessment technique that helps organisations understand the relationships between causes, controls and consequences. This technique can be applied to any type of risk (e.g. environmental, business/financial, occupational safety, etc). However, the resource-intensive process needs to be assessed against the risk management benefit. This technique is best used for high-risk, complex processes.
By presenting potential causes, consequences and controls in a single diagram, Bowtie Analysis provides a practical way to communicate complex risks and identify opportunities to reduce risk.
But when should an organisation use Bowtie Analysis, and how does it fit into a broader risk management strategy?
What Is a Bowtie Risk Assessment?
A Bowtie Risk Assessment is a structured method of examining the causes, consequences and controls of a potentially hazardous event. It is a visual representation of a traditional spreadsheet risk assessment or risk register.
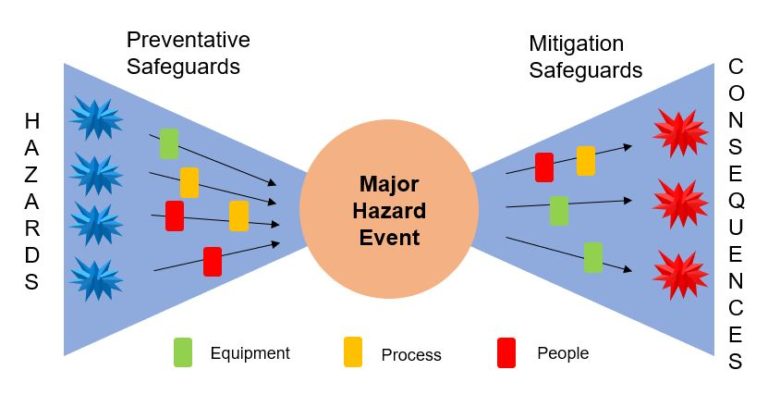
The technique gets its name from the shape of the diagram, which resembles a bow tie. In the centre of the bowtie is the centre event or loss of control event, where the hazard becomes irreversible (e.g. loss of containment, generation of a flammable atmosphere, etc). On the left are the potential hazards that could lead to the centre event, along with preventative controls designed to stop the hazard from progressing to the centre event. On the right are the potential consequences of the event, together with mitigative controls intended to reduce the likelihood of the consequences occurring or to reduce the severity of the impacts (e.g., injuries rather than fatalities).
For example, consider a facility that stores hazardous chemicals. A Bowtie Assessment might examine a loss of containment from a storage vessel. Potential threats could include:
- Overfilling during chemical transfer,
- Vessel integrity failure (e.g. corrosion)
- Overfilling due to level miscalculation (operational error).
Preventative controls might include a level switch to shut down the transfer pump before overfilling, maintenance procedures and operating procedures/checklists.
If a loss of containment occurs, potential consequences could include:
- Toxic vapour (personnel exposure)
- environmental contamination
- Fire (personnel exposure).
Typically, only one category of consequence (e.g., health and safety) is depicted on the bowties to avoid confusion about which controls apply to specific causes or consequences. For example, discharge monitoring for environmental purposes will have different systems and trigger points that may not be relevant to personnel exposure. Unless the controls are applicable to all consequences or able to be segregated to a particular consequence, it is best to produce separate bowties for different types of risk.
Mitigative controls might include spill containment systems (bunding), flammable gas detection and alarm, emergency isolation arrangements and emergency response procedures.
By displaying these relationships visually, a Bowtie diagram helps personnel understand both how an incident might occur and the controls relied upon to manage the risk. Causes or consequences with too few controls can also be identified for further risk management. Colour coding can also be used to assist in communication and easy identification of risk levels.
How Does Bowtie Analysis Work?
Bowtie Analysis follows the same process as any other risk assessment process. It is best conducted as a group workshop to draw on the knowledge and experience of site personnel. The process is as follows:
- Preparation
- Hazard identification (HAZID) and Screening
- Bowtie drafting
- Risk Assessment (including control identification and effectiveness)
- Risk reduction
1. Preparation
In the preparation stage, the purpose (i.e. type of risk), rulesets, assumptions and scope should be defined. These will assist in focusing the workshops on the specific scope, provide repeatability and enable quicker decision-making.
Rulesets should be developed for defining and assessing controls, consequence severity thresholds for inclusion in the risk assessment, likelihoods of common events on site (e.g. power outage, maintenance shut downs, etc) or identify industry databases of failure likelihoods.
If conducting the analysis across the whole site, it is best to break the site into areas or activities for the HAZID to ensure the process is comprehensive and to provide better focus for participants. The battery limits of each area/activity need to be defined.
Information will also need to be collated to assist with the HAZID, such as material safety data sheets for chemicals used on site, operating conditions, process flow diagrams, operating procedures, etc.
2. Loss of Control Event, Hazard Identification and Screening
The next step
identify the LoC events for each area/activity. This may be conducted with area/activity representatives prior to the HAZID workshop. The LoC events should be screened against the purpose/scope to determine if they can be rejected. For example, Major Hazard Regulations require an event to involve Schedule 15 materials, if the area does not have Schedule 15 materials or impact nearby Schedule 15 materials, it can be rejected on this basis.
The HAZID is then conducted on the LoCs that fit the scope definition. It is best to define the potential consequences first so that the participants are focused on identifying hazards that could result in the specific consequences. The HAZID workshop should be conducted in a systematic way using guidewords and supporting information (e.g. incident reports, industry news, etc). All hazards should be noted without judgement.
Screening of the hazards against their potential to reach the scope is conducted after all hazards have been identified. Only the hazards that meet the scope are taken to the risk assessment.
3. Scenario Drafting
This stage involves consolidating the LoC events and associated hazards into bowtie scenarios. Consolidation should occur based on:
- The location and magnitude of consequences is sufficiently similar
- Minimising teams involved in a bowtie.
As a communication tool, it is important to maintain clarity by consolidating the number of hazards and reducing the number of different teams involved in the bowtie. Aim to have everything on one bowtie being relevant to one team, rather than personnel sifting through hazards to find the ones relevant to them. This also makes the workshops more efficient by reducing the number of personnel required in each.
4. Risk Assessment
Once the scenarios are drafted, the risk assessment workshops can be conducted with the relevant teams following a typical risk assessment process (assigning hazard likelihoods, control identification, risk rating).
It is important that the team follows the rulesets and definitions to ensure only relevant and effective controls are applied to the bowtie.
5. Risk Reduction
With the bowties developed, it should be easier to identify which hazards are the highest contributors to the overall risk and where additional controls are required.
What are the Benefits of Bowtie Analysis?
One of the main advantages of Bowtie Analysis is its ability to communicate complex risk scenarios in a relatively straightforward format.
Other benefits include:
- Identification of control gaps: Helps highlight areas where preventative or mitigative measures may be insufficient.
- Better risk communication: Makes important safety information easier to understand across different levels of an organisation and to external Regulators.
- Support for critical control management: Provides a basis for identifying, assigning responsibility for and monitoring important safeguards.
- More informed risk reduction: Helps organisations prioritise improvements based on the threats, consequences and controls identified. Particularly useful for identifying the effects of change management on risk.
Are There Limitations to Bowtie Analysis?
Although Bowtie Analysis is a valuable risk assessment technique, it is important to understand its limitations.
The quality of a Bowtie Assessment depends heavily on the accuracy of the information used and the experience of those involved in developing it.
Importantly, a Bowtie diagram does not automatically demonstrate that a risk is adequately controlled – it is only a risk model. The controls must be continuously maintained and monitored in the field to provide tangible protection.
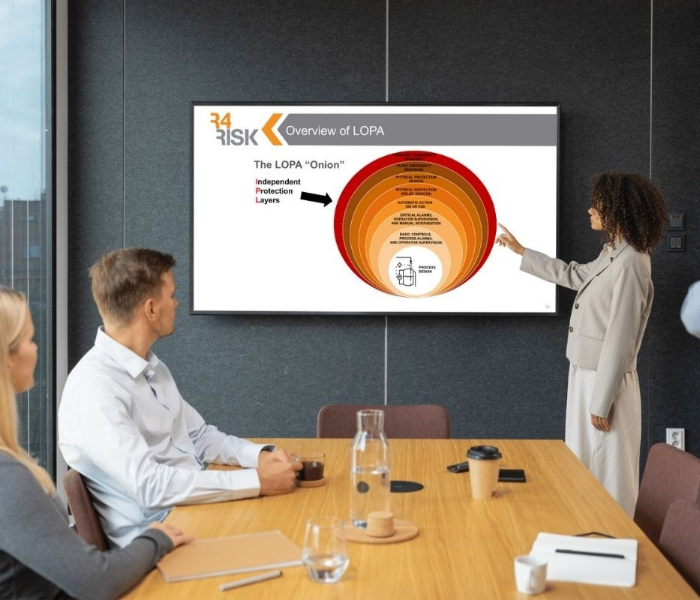
For more complex scenarios, Bowtie Analysis may be supported by other risk assessment techniques, such as Layers of Protection Analysis (LOPA) or Quantitative Risk Assessment (QRA) or detailed anaylsis, such as Consequence Modelling.
Selecting the appropriate combination of techniques depends on the nature of the hazards and the level of detail required.
What Happens After a Bowtie Assessment?
Completing a Bowtie diagram should not be the end of the risk management process. The real value comes from using the assessment to improve safety performance.
Organisations should consider how the findings will be incorporated into their operational systems, including:
- Implementing identified risk reduction actions
- Assigning responsibility for maintaining control effectiveness
- Establishing processes to verify control effectiveness
- Trigger points and escalation protocols when the risk changes (e.g. disabling a control for maintenance)
- Communicating relevant findings to employees
- Periodically reviewing and updating assessments
For example, identifying a critical control is only useful if the organisation can demonstrate that the control is maintained and continues to perform its intended function.
R4Risk explores this important topic in its webinar, After the Bowties – The Story Continues, which discusses how organisations can translate Bowtie findings into ongoing risk reduction activities.
Do You Need Professional Assistance with Bowtie Analysis?
While Bowtie diagrams are relatively straightforward to understand, developing an effective assessment requires a thorough understanding of the hazards, potential incident scenarios and applicable safety controls.
Professional assistance can be particularly valuable when dealing with complex industrial processes.
Experienced risk consultants can help organisations structure assessments, facilitate discussions with relevant personnel and identify opportunities for risk reduction.
R4Risk provides professional Bowtie Analysis services to help organisations identify and evaluate major hazards, assess risk controls and strengthen their approach to ongoing risk management.
For organisations looking to develop their internal capabilities, R4Risk also offers an Introduction to Bowtie Analysis training course.
The course introduces participants to the Bowtie methodology and provides practical experience in developing a Bowtie assessment.
R4Risk’s experienced risk management consultants can assist organisations with Bowtie Analysis and the development of effective risk control strategies.
To discuss your organisation’s requirements, contact R4Risk to learn more about its Bowtie Analysis services.